by Danielle Petroskey, Marketing

On the first shirt of Christmas, we printed a “Santa, did you get my text?” Screen Printed Transfer
On the second shirt of Christmas, we printed “North Pole” Plaid Text with Light String
On the third shirt of Christmas, we printed a “Dear Santa, I Want It All” Rhinestone Transfer
On the fourth shirt of Christmas, we printed a “Hairy Christmas” Screen Printed Transfer
On the fifth shirt of Christmas, we printed “Harwood Winter Fest” CAD-PRINTZ® Transfer
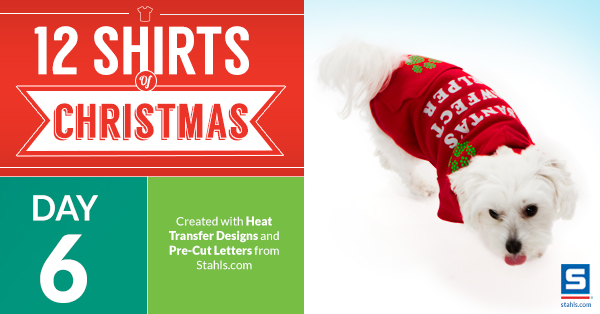
On the sixth shirt of Christmas, we printed a “Santa’s Pawfect Helper” Pet Shirt with a Nailhead Transfer & Pre-Cut Letters
We know Santa has elves at the North Pole, but did you know he also has helpers in lots of homes too? Of course you did! While many of them are of the human sort, Chloe is one of his special helpers of the canine variety. So we decided to create this adorable shirt to help her stand out. We think your customers will love customized apparel for their pet helpers too!
This is how we created this special shirt:
 Items used:
Paw Prints – Neon Nailhead Heat Transfer Design
Lettering – Thermo-FILM® Pre-Cut Letters in ¾” Cooper font
Tools Needed:
- Heat press
- Print Perfect Pad or heat printing pillow
- Non-stick cover sheet or Kraft paper cover sheet
- Heat eraser cooling tool
- Scissors
- Lettering Layout Guide
- Thermo Tape
Garment: Blank pet apparel
Application Instructions:
Nailhead Paw Prints Application Instructions:
Temperature: 325° F
Pressure: Firm (#8 on Hotronix® heat presses)
![]() Tip: Using a heat printing pillow or print perfect pad is recommended to raise the printing area, when working around the heavy seams and pockets of a hoodie.
Tip: Using a heat printing pillow or print perfect pad is recommended to raise the printing area, when working around the heavy seams and pockets of a hoodie.
- Using scissors, cut the paws apart into separate transfers
- Place garment on lower platen and preheat it for 10 seconds to remove wrinkles and moisture
- Remove the textured backing from the nailhead transfers
- Position the transfers sticky side down on the garment
- Cover whole garment with a cover sheet
- Heat apply for 10-12 seconds
- Smooth the heat eraser over the non-stick cover sheet until designs are cooled.
- Peel the clear mask from the transfers
Thermo-FILM® Pre-Cut Lettering Application Instructions:
Temperature: 330° F
Pressure: Medium (#6 on Hotronix® heat presses)
- Separate the letters being used from the individual bags in which they arrived
- Lay out the letters on the Lettering layout guide and gently cover with Thermo Tape to create a small carrier to place on the garment.
- Position lettering on the garment
- Cover entire garment with a cover sheet
![]() Tip: To create a slight sheen on the letters, use a non-stick cover sheet. For a more matte finish, use a Kraft paper cover sheet.
Tip: To create a slight sheen on the letters, use a non-stick cover sheet. For a more matte finish, use a Kraft paper cover sheet.
- Heat apply for 6-8 seconds
- Sell garment to all of your customers’ special helpers!

Where can we get the blank pet apparel?
Hi Galina,
AlphaBroder’s website has a selection of apparel for dogs, including shirts and scarves.