
Do you have custom graphics that you’d like to heat apply? Looking for one, two, or full color heat transfer logos? Send us your artwork! We have you covered with quality options that will wow your customers. Uploading your artwork is simple. We’re always here to help make things easier for you and your business. Follow along for an in-depth walk through of our artwork uploader – including common questions, mistakes, and troubleshooting tips!
1. Attaching Files
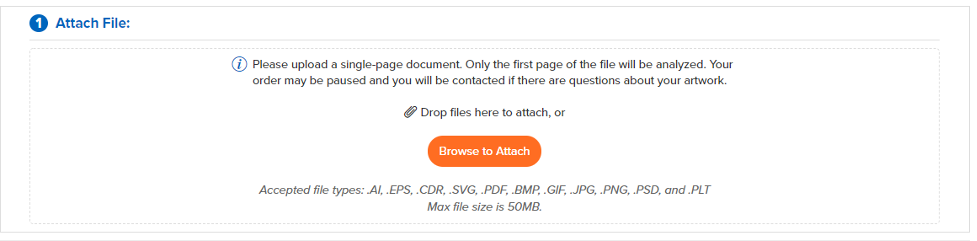
To start, open the artwork uploader. Once logged in, you’ll see an orange bubble that says, “Browse To Attach”. Drag and drop your art file or click into the bubble to search your computer.
Tip – Save your artwork in an easily accessible place like a folder on your desktop
Possible Mishaps
There are two potential mishaps in this beginning step. First, make sure your file type is saved in an acceptable format: .AI, .EPS, .CDR, .SVG, .PDF, .BMP, .GIF, .JPG, .PNG, .PSD, and .PLT. Next, the file names of your artwork file cannot include any special characters such a hyphen, apostrophe, question mark or exclamation point, etc. Anything other than letters, underscores, or spacing may cause issues attaching. If you receive an error message, double check the file type and saved name.
2. Selecting Service Type
There are a lot of options to choose from, but don’t worry! Simply hover your mouse over the little blue “i” graphic for a more detailed explanation of each service type STAHLS’® offers. The drop-down menu illustrates a basic product overview and minimum order information. Here are a few quick notes about each type to help you filter in no time!
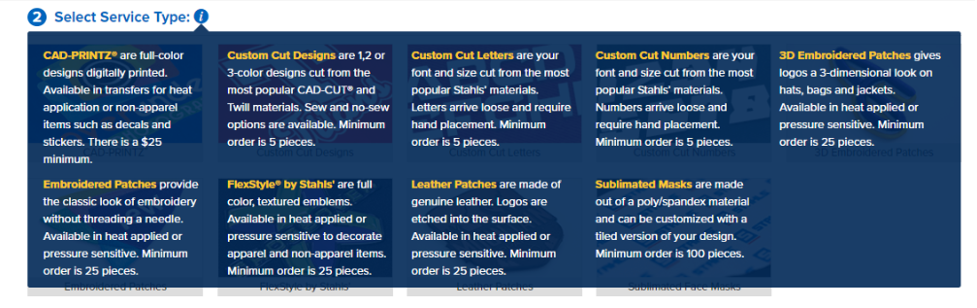
Service Type Options
- CAD-PRINTZ®: A full color digital transfer that is printed on different material options for varying apparel or non-apparel items.
- Custom Cut Designs: This area is for CAD-CUT®, SimStitch™, or applique materials.
- Letters: For ordering individual packs of letters A-Z in a custom font.
- Numbers: For ordering individual packs of numbers 0-9 in a custom font.
- 3D Embroidered Patches: Most dimensional, heat applied patch options. *Requires a heat press with upper and lower simultaneous heating ability.
- Embroidered Patch: Flat, heat applied, embroidered patches available in up to 6 thread colors.
- FlexStyle® by Stahls’: Unique & quality embossed patches with varying thickness levels and effects.
- Leather Patches: Etched, genuine leather in 3 different color finish options.
- Sublimated Face Masks: Poly/spandex masks customized with your artwork in a tiled pattern.
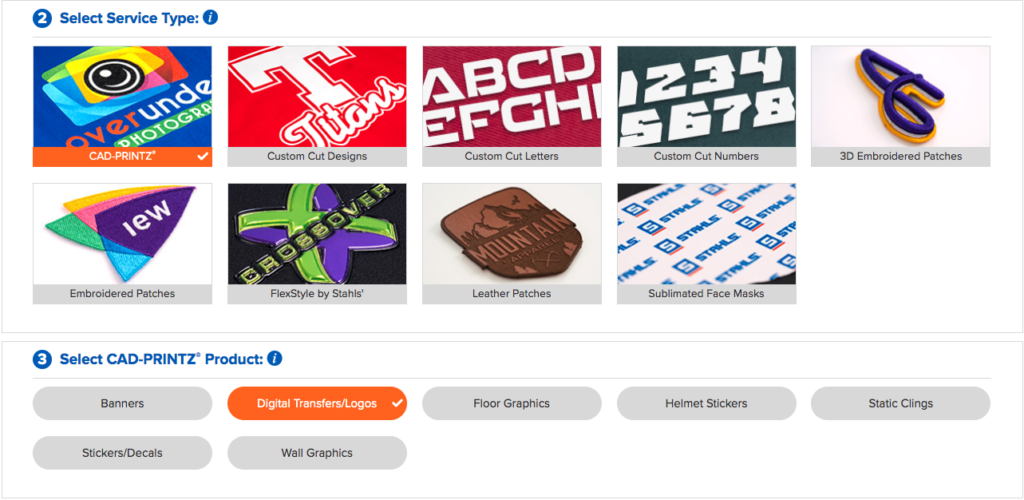
3. Select Product
Production selection options are endless! In this example, we have selected CAD-PRINTZ® as the service type and digital transfers/logos as the product type. This is the most common product option; however, you can also select other CAD-PRINTZ® products such as:
- Banners
- Floor Graphics
- Helmet Stickers
- Static Window Clings
- Stickers/Decals
- Wall Graphics
All available choices are full color, vibrantly printed products for any apparel or non-apparel items.
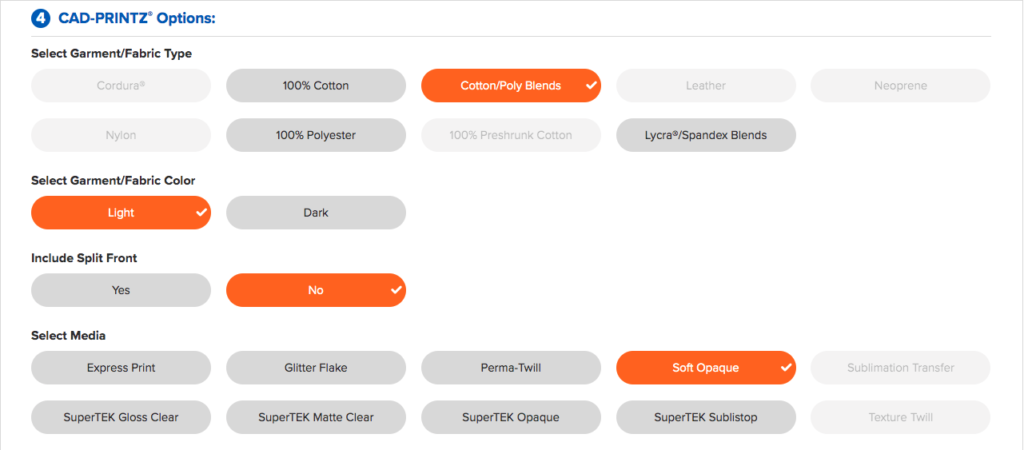
4. Product Type Options
This next section will be different for everyone based on what your prior selections are. We included varying selections to ensure the correct material will be compatible with your garment fabric. Choose the fabric type and select the garment color. This is an important selection for garments that are dark and prone to dye migration, such as bold, colored polyester fabric. After you toggle through Split Front options and Select Media, you’re ready for the next step! Note: Split Front designs are often used with button-front shirts/jerseys such as baseball uniforms.
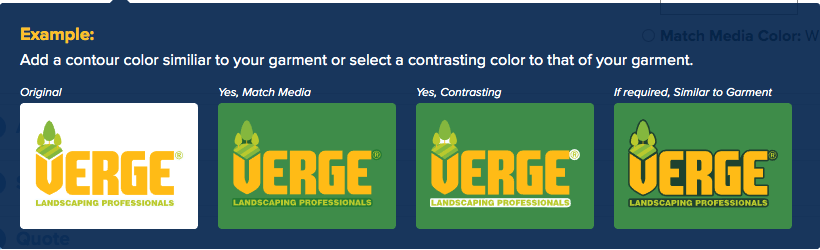
The final step is to denote an outline color. This may be required if any portion of your design is too small to cut. We provide suggestions from our STAHLS’® digital colors or you can enter Pantone® color. You may choose a color that closely matches your garment color, or choose a contrasting color to make the design stand out. Check out the example below.
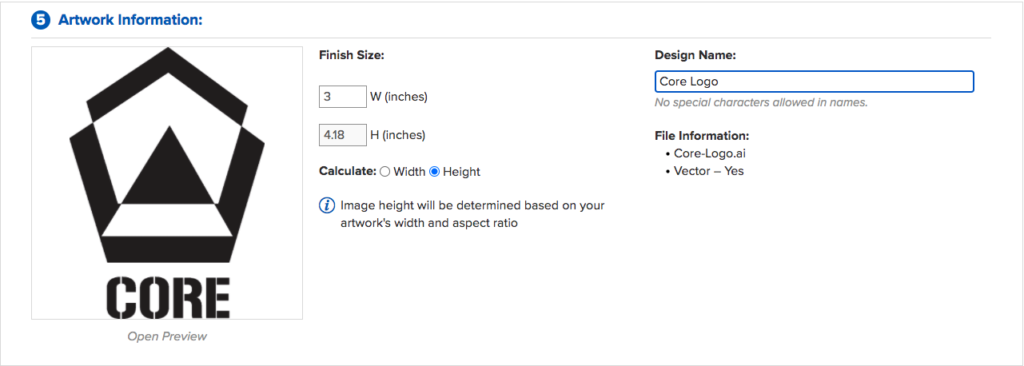
5. Artwork Information
You’ve filtered down to the sizing portion of the upload. You will see a thumbnail preview of your attached artwork along with sizing and design name information. Enter the width, and the sizing analyzer will automatically read the height. After the sizing is entered, type the Design Name for your upload. Under the Design Name, you’ll see File Information, indicating your saved file name and type, and if the artwork is vector or raster. Note: To calculate by height, click the blue bubble next to width in the example above.
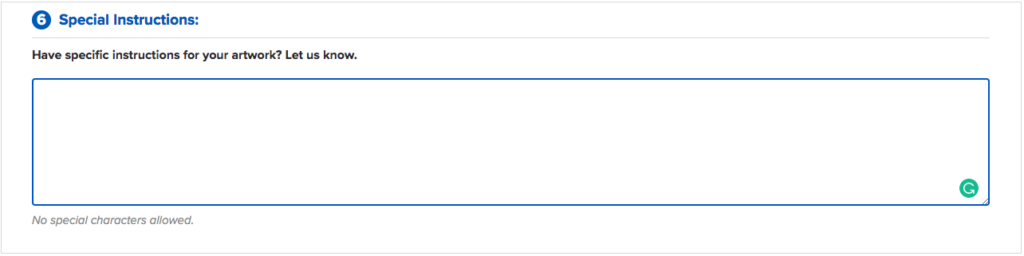
6. Special Instructions
This area is for communicating directly with the logo representatives who will be reviewing your artwork. If there is any preliminary information you’d like to share regarding your artwork, this is the place to do it. Some common examples are: “Please call me when reviewing, I’d like to discuss this artwork with you in greater detail” or, “I need this to be exactly 2.5” x 2.5”. Unlike the rest of the uploader prompts, you do not have to type anything in this area to keep moving forward. If you don’t have any special instructions or notes to make for us, you can move to the next step.
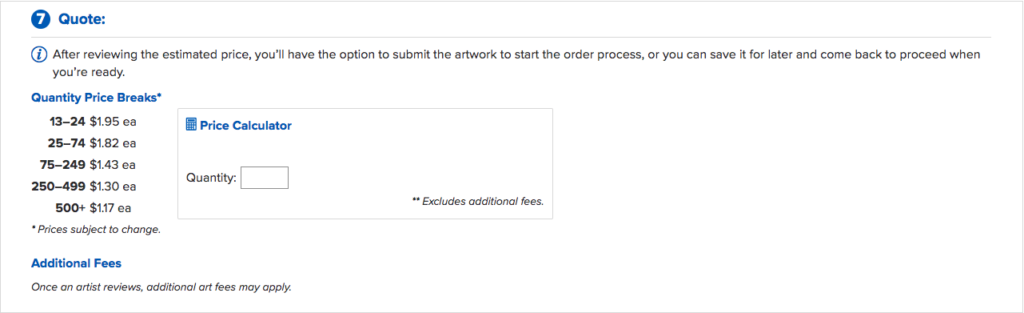
7. Quote
How much will it cost? Based on all your selections until this point, the artwork uploader will give you a price per piece and all the quantity price breaks. The height and width of your artwork will determine the pricing, as well as service and material selections above. If you’d like to scale down the pricing a bit, scroll back up to Section 5 and adjust the sizing until you’re at a comfortable price point. Note: You do not need to indicate the quantity here. This section is for quoting only. We suggest waiting until our team has reviewed your artwork and you receive a proof before quoting your customers.
8. Contact Information
Lastly, make sure your contact information shows up correcting in the fields below. The system will auto-populate the contact information based on the account holder; however, it’s important to include the name and email address for the main point of contact regarding the specific upload. If our logo representatives need to reach out for any questions, it helps if we can have the direct contact info. Since we primarily communicate via the Art Dashboard, you will receive an email notification on the status of your artwork. In addition to that, you will get an email alerting you if any actions are required in the dashboard in order to move on with the order.

9. Final Steps & Common FAQ’s
After the contact information is entered, you’re all set! If you’re ready to move forward with the proof process, click the “Submit Artwork” button. Click “Save for Later” if you’re only looking for a quote or are waiting on confirmation to move forward. The upload will remain saved in your Art Dashboard until you’re ready to resume and submit.

Artwork Uploader FAQ’s
I’m stuck and the next section isn’t loading. What do I do?
All prompts must be selected within the Artwork Uploader. If you find that the uploader won’t let you go any further, you’ve likely missed answering one of the selections above. Scroll back up to make sure you’ve entered a selection for every area of each section.
What is a raster image fee?
A raster image is a non-vectorized piece of artwork. We require artwork to be vectorized line art for production cutting purposes. For more information on the differences between raster and vector, check out a previous blog post.
What do I do after I submit my artwork?
You will receive an email notification when your proof is ready or if there are any questions regarding your artwork. For vector artwork, you will typically receive a proof within 24-48 hours of uploading. Raster images will have proofs uploaded roughly 48 hours after the artwork setup fees are paid.
What is production and shipping time?
Once your proof is approved, orders under $500 total will ship the following business day
All custom logo orders ship from MI. You will have the option for Ground, 2-Day, or Overnight shipping services when placing your order, with cost and estimated transit time for each method.
Why is my sizing not reading accurately?
Raster images often have a transparent background to the artwork. Vector images can also be submitted on a colored background. In these instances, the sizing analyzer is reading the entire background rather than the specific artwork shape. If you find that the sizing isn’t accurate, please indicate the preferred sizing for your upload in the Special Instructions prompt.
What is Interchangeable Data?
If you require a custom font for a list of roster names or numbers to be setup as ready to apply heat transfers, this is a Custom Logo order for Interchangeable Data. Interchangeable Data requires a $20 artwork setup fee that will cover up to 100 variable data elements. For orders require a custom list of names or numbers, we need a True Type Font File and an Excel Spreadsheet with the list of varying data.
Will my artwork be saved? How do I reorder?
After proof approval, your custom logo uploads are in your Custom Art Dashboard for easy ordering. The design will still in the Custom Art Dashboard for 18 months to be easily reordered. If not, it will automatically go into your Archive Tab. Archived designs will remain on file for 12 months.
That was a lot of information, but we appreciate you following along with us! Now that you’re a seasoned pro and have this resource to refer to, it’s time to start uploading with the artwork uploader. Contact our Custom Logo Department directly at 800-235-3164, if you are still having issues that aren’t resolved with these tips!
Hello a lot of options you have going I just want a quote for iron on logo decals what’s my process for that ?
Hi Bobby, thanks for reading along! All quotes can be handled directly with our customer service team! You can reach them here: 800.478.2457