

Spring is a time for deep cleaning and getting organized. Don’t overlook your vinyl cutting equipment! There are many common maintenance tips to keep your vinyl cutter running efficiently all year. Recognize when it’s time for some upkeep on your cutter with these 3 common vinyl cutter troubleshooting tips below.
1. Skipping Cuts & Perforated Lines


Have you noticed any errors in your cutting lines? Does it seem like the blade is skipping along your HTV leaving your cut lines looking perforated? Do you remember the last time you replaced your cutter protection strip? Many people don’t realize the importance of such an inexpensive replacement part. Run your finger along the strip, located across the length of the machine where the blade cuts. Do you feel any gashes, gaps, or divots anywhere on the strip? If so, it’s time for a replacement!
The strip protects the blade and allows for a smooth pivot when cutting. Sharp cuts and crisp cut lines are crucial to easy weeding and quality heat application. Cutting strips are inexpensive to replace. Be sure to check your strip regularly. Simple maintenance will cause less material waste and prolong the life of your blades and vinyl cutter. In the video below, learn more about the cutter protection strip and keeping your blade holder clean.

2. Shallow or Deep Cuts


Are you cutting through the vinyl carrier even with proper force? Do you see faint or missing cut lines completely? The logical solution seems to be to extend the blade out for a deeper cut and withdraw the blade for shallow cuts. This isn’t exactly incorrect; however, what’s most important is to make sure you have the blade depth set to a specific standard. The blade should never extend more than the width of a credit card below the blade holder. Keeping the blade depth consistent is important to protect your blade and ensure complete cuts.
We always recommend following the force and speed settings within the manufacturer’s specification for the heat transfer vinyl. Be sure to perform a test cut first. Test cuts are a great way to reduce waste. Controlling your blade depth will save time, material, and potential frustration. To properly adjust the blade depth, check out the tutorial below.

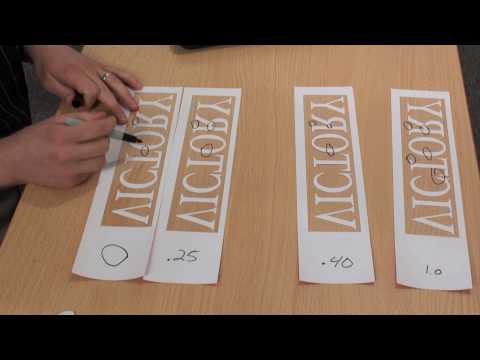
3. Rounded Corners


Are you seeing rounded cut corners rather than sharp, crisp edges? Does it look like little flags in the material of your design? Your vinyl cutter will come with a factory default offset. Many people disregard this setting because it’s not as easy to find as force or speed. Changing the offset doesn’t need to be a challenge. The offset is how the machine balances itself depending on what blade you are using. When using a standard 45° blade, start with a .25 and slowly go down to .20 until you get a clean cut. For a 60° blade, a good place to start is .50. Rounded corners mean the offset should be raised; if there are small flags, the offset should be lowered. To better understand the importance of the offset setting on your vinyl cutter, make sure to check out this video.
If you’re interested in upgrading your vinyl cutter, be sure to check out our exclusive vinyl cutter packages we offer. These vinyl cutter packages are designed to give you the equipment, materials, accessories, and training you need – all while saving you hundreds of dollars.

